Posting an Email When Sending
When you click on the New Email button to open a new email within Outlook
and the COM Add-In is enabled, the NEEDLES ribbon will display the Post
Email to Needles ribbon group. After you have written and addressed the
new email, you may select the Send
and Post by Name button or the Send
and Post by Case button . These options will let you post the email
to the Notes tab and any attachments to the Documents tab of the selected
Case or Provider.
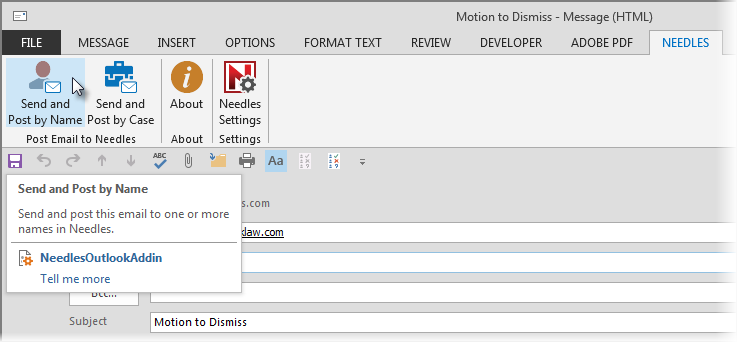
If you create a new email from within Needles by clicking
a party’s or provider’s email address, the Case # or Provider ID will
be assigned automatically to the email (though you won’t see it), and
when you click Send and Post by Case or Send and Post by Name, it will
search on that Case or Provider automatically.
To post an email when sending,
- Clicking either of the Post Email to Needles options
will open the Needles Outlook Search Window. An automatic search of
the system will occur using the first email address in the To field
of the email. If there are no results from that search, then
- When selecting the Send
and Post by Name button, the search filter is defaulted
to search
by name.
- When selecting the Send
and Post by Case button, the search filter is defaulted
to search
by case number.
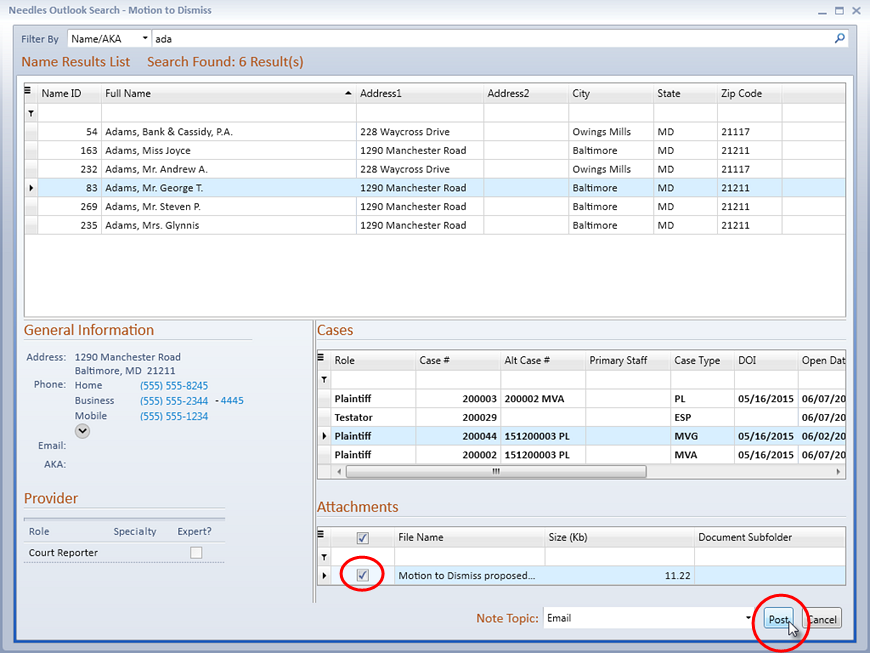
- Click to select the Provider
Name or the Case to
which you wish to post.
If a name from the search
results is listed in a case and as a provider, select either the Case
number or the Provider Role and double-click or click the Post
button to post to the desired area.
- If the email being posted has attached files, they will
be listed in the Attachments section of the window. Click the check
box(es) to select Attachment(s) that you wish to post to the Documents
tab of the selected Case or Provider.
- If Folder Naming has been enabled in Firm
Preferences, you have the option to save the email attachments
in a subfolder of the default file path for that Case or Provider.
Using the Document Subfolder
dropdown, select the desired subfolder. Dropdown options are defined
in the Document
Naming Subfolder Mini
Directory.
- If Folder Naming is disabled, a Browse
For Folder window will display when the Post
button is clicked, allowing a file path to be manually selected
in which to save the attachment(s).
- The Note Topic “Email” will be assigned by default but
may be changed using the Note Topic dropdown to select the desired
topic prior to posting. The Note Topic dropdown will display topics
from the Case
Note Topics Mini Directory when posting to a case or from the
Provider
Note Topics Mini Directory when a Provider (a name not attached
to a case) is selected.
- Click on the Post
button to send and post the email and selected attachment(s) to Needles.
The Case Confirmation message will display when the email has successfully
posted to a case. A similar Provider Confirmation message will display
when the email has successfully posted to a provider. The email will
be sent after it has posted successfully and either the Go To or Close
button has been clicked.
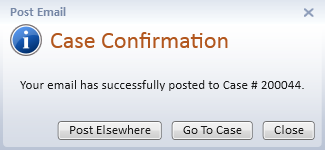
- Click on any one of the following options on the Case
Confirmation message:
- Post Elsewhere
- Post the same email to a different case or provider within Needles.
- Go To
Case - Go to the case or provider to which your email was
just posted.
- Close
- Click the Close button to end the posting process.
- If the case selected for posting was part of a Companion Case Group, the
Case Confirmation message will contain a fourth option.
- Post To Companion
Cases - Post the same email
to companion cases.
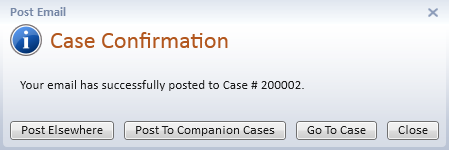
- When clicking on the Post To Companion Cases button,
the Companion Cases Selection Window will display the companion groups
to which the case belongs as well as the member cases for each group.
Select the desired companion cases
to which the email should be posted.
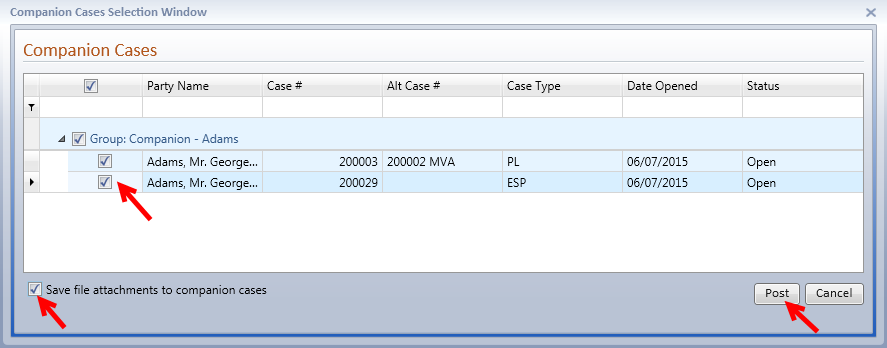
- Click the check box to select the option Save
file attachments to companion cases (which appears when Attachments
have been selected for posting on the original post) if you wish to
post the attachments to the documents tab of each of the selected
companion cases.
- Click on the Post button to post the email to the selected
companion cases. The Case Confirmation message will display when the
email has successfully posted.in which to save the attachment(s)