Adding Notes
To add a new Note to a case,
- If this is the first Note for the selected case, a blank
Note Detail screen will display. An Entry ID of 1 will be assigned
to the first note in a case.
- If Notes already exist for the case, the last Note will
display. Click on the Add
button
 on the Case ribbon to open a new blank Note entry screen. An Entry
ID will be assigned the next sequential number.
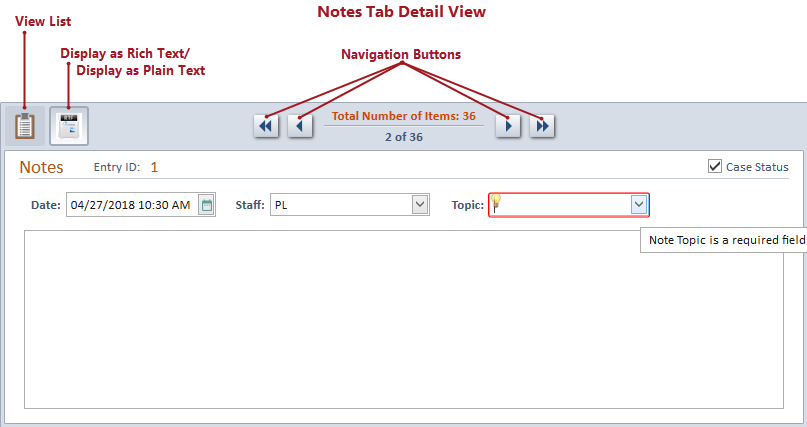
- The current date and time will populate the Date
field. Click on the Calendar icon
 or click into the field
to enter a different date or a new time if needed.
A future date is not allowed
and will trigger a validation warning.
- The Staff
field will pre-fill with the Staff Code of the currently logged user
by default but may be changed by clicking the Staff dropdown. All
active staff codes from the Staff
Directory will be listed.
- Select a Topic
from the dropdown list in order to save the Note. Topics are defined
in the Case
Note Topics Mini Directory. The Topic field is required, and a
validation warning will display when attempting to save a note without
a Topic.
- Enter the desired note
text into the text field. If rich text is enabled, click on
the Display as Rich Text button
to convert the note text to rich text. Apply any rich text formatting as
desired. Use the spellchecker on
the note text by clicking the Spellcheck icon
 on the Quick
Access Toolbar.
- If you have elected to use the Case Status tab in the
case type and it includes Note information, the Case Status check
box will be available. Click on the Case
Status check box to select information from this Note to be
displayed on the Case Status tab.
The Case Status option
in the Case
Note Topics Mini Directory can be set to automatically select the
Case Status check box in a Note when a specific Case Note Topic is selected.
- Click on the Save
button on the Case ribbon to save changes to the Note.
- Click on the View List
button to return to the list of Case Notes.