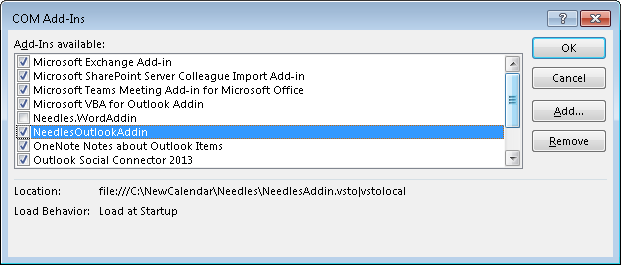
The Needles Outlook COM Add-In is automatically installed with your Needles 5.0 version, however, you will need to enable the COM Add-In within Outlook on each machine to access the NEEDLES ribbon.
The COM Add-In contains the programming code that provides the direct link between Outlook and Needles. The instructions for activating the COM Add-In vary slightly, so follow the instructions for the version of Outlook being used.
These steps are user-specific and must be performed while logged into the computer as the user who will be using the integration.
If a workstation is shared by more than one user (such as part-time workers who log into that computer with the same username as well as into Needles with the same staff name) and each has their own Outlook profile on that workstation, then these steps should be followed for each separate Outlook profile.
To activate the Needles Outlook Add-In:
| Version | Browse to Add-In |
Outlook 2016 |
File > Options > Add-Ins > Click Go... next to "Manage COM Add-Ins" |
Outlook 2013 |
File > Options > Add-Ins > Click Go... next to Manage COM Add-Ins" |
If you started Outlook with the “Run as Administrator” option, then close Outlook and restart it normally.
If a workstation is used by more than one user and multiple Outlook profiles have been created on that workstation, steps 1 through 3 should be completed under each user’s profile.
| Minimum Needles Version1 | Minimum Outlook Versions Required3 |
Needles 5.0 |
20164 2013 (32-bit)4 |
1The most recent version of Needles is recommended when using the Outlook interface.
2Outlook must be installed and configured correctly as the default email program on each computer. Each user’s mail profile must be set up correctly and configured as the default email profile.
3Not compatible with Trial editions of Outlook.
The Needles Outlook integration has been tested and found to work with Outlook using a Microsoft Exchange, IMAP/SMTP or No-E-mail account setup. If you are using Outlook with any other mail server or e-mail account type, it is recommended that you carefully test the bidirectional integration on just one computer before configuring it on any others.
The user must have Administrator rights to the computer on which they are loading the Add-In. If the user does not already have those rights, they must be granted those rights at least temporarily to load the Add-In and then their rights can be changed back once the Add-In is loaded.
The Needles COM Add-In may not work correctly if other add-ins are being used which modify the data within the Outlook Contacts, Calendar or Tasks folders.