Bidirectional Updating
When your accounting system is configured to use the QuickBooks SDK
Interface and General settings have been configured in the QuickBooks
SDK tab in Needles, updates such as adding a client party to a new
or existing case, modifying a Party or Provider in Needles, updating a
Customer or Vendor in QuickBooks, modifying a check or deposit, or printing
a check will trigger messages that facilitate the bidirectional update.
Adding a Client Party
When the Save button is triggered while adding a new Party, flagged
as Our Client, to a new or existing case in Needles and the “Prompt
to add client to QuickBooks when a new case is created” check box
is selected, a QuickBooks Customer Job message will display.
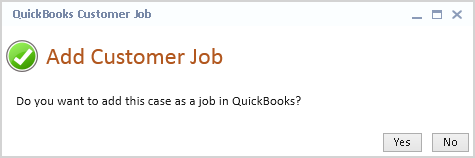
- Click the Yes
button to add the Party as a new Customer in QuickBooks and create
a Job using the Needles Case Number.
- Click the No
button to prohibit the Customer Job from being be created in QuickBooks.
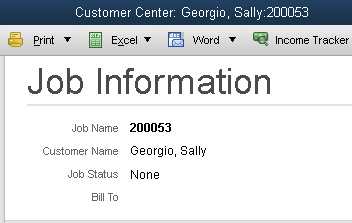
Navigate to QuickBooks and notice that the newly added Party marked
Our Client from Needles has been created as a Customer in QuickBooks with
the Needles Case Number as the Job Name.
Modifying
Party/Provider or Customer/Vendor Contact Information
When name or contact information of a Party/Provider is updated in Needles
or the Customer/Vendor is updated in QuickBooks and the “Allow
address changes of Customers and Vendors” check box is selected, corresponding
fields will be automatically updated in the synced program.
Modifying a Check in
QuickBooks
When the date, check number or amount of a check is modified in QuickBooks
and the Save button is clicked,
a Recording Transaction message will display.
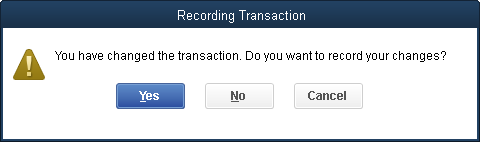
- Click the Yes
button to save changes in QuickBooks and update the linked Value Transaction
item in Needles.
- Click the No
button to save changes in QuickBooks but NOT sync changes to Needles.
- Click the Cancel
button to return to your changes.
Voiding a Check in QuickBooks
When a check is voided in QuickBooks, ‘VOID’ will display in the Memo
field of the check. Clicking the Save
button will trigger the Recording Transaction message.
- Click the Yes
button to save changes in QuickBooks and update the linked Value Transaction
item in Needles as follows:
- The text ‘VOID’ will be appended after
the check number in the Reference field,
- Any linked DTF items will be deleted,
- The Paid Amount will be set to $0.00,
- The Due amount will be recalculated,
and
- The Paid By and Paid To fields of
the transaction will be deleted.

- Click the No
button to save changes in QuickBooks but NOT sync changes to Needles.
- Click the Cancel
button to return to your changes.
Deleting a Check in QuickBooks
When a check is deleted in QuickBooks, ‘DELETED’ will display in the
Memo field of the check. Clicking the Save
button will trigger the Recording Transaction message.
- Click the Yes
button to save changes in QuickBooks and update the linked Value Transaction
item in Needles as follows:
- The text ‘DELETED’ will be appended
after the check number in the Reference field,
- Any linked DTF items will be deleted,
- The Paid Amount will be set to $0.00,
- The Due amount will be recalculated,
and
- The Paid By and Paid To fields of
the transaction will be deleted.
- Click the No
button to save changes in QuickBooks but NOT sync changes to Needles.
- Click the Cancel
button to return to your changes.
Printing a Check
When a check is printed in QuickBooks and the OK
button is clicked to confirm the check printed properly, the check number
will display in the Reference field of the Value Transaction item in Needles.
The Transaction Date will display the date the check was last modified.
If the check amount is different than the transaction amount, Needles
will recalculate the amount of linked item, as well as the DTF item, if
applicable.
Modifying a Deposit
in QuickBooks
When the date, deposit number or amount of a deposit is modified in
QuickBooks and the Save button
is clicked, a Recording Transaction message will display.
- Click the Yes
button to save changes in QuickBooks and update the linked Value Transaction
item in Needles.
- Click the No
button to save changes in QuickBooks but NOT sync changes to Needles.
- Click the Cancel
button to return to your changes.
Voiding a Deposit in
QuickBooks
When a deposit is voided in QuickBooks, ‘VOID’ will display in the Memo
field of the deposit. Clicking the Save
button will trigger the Recording Transaction message.
- Click the Yes
button to save changes in QuickBooks and update the linked Value Transaction
item in Needles as follows:
- The text ‘VOID’ will be appended after
the deposit number in the Reference field,
- Any linked DTF items will be deleted,
- The Paid Amount will be set to $0.00,
- The Due amount will be recalculated,
and
- The Paid By and Paid To fields of
the transaction will be deleted.
Deleting a Deposit
from QuickBooks
When a deposit is deleted in QuickBooks, ‘DELETED’ will display in the
Memo field of the deposit item. Clicking the Save
button will trigger the Recording Transaction message.
- Click the Yes
button to save changes in QuickBooks and update the linked Value Transaction
item in Needles as follows:
- The text ‘DELETED’ will be appended
after the check number in the Reference field,
- Any linked DTF items will be deleted,
- The Paid Amount will be set to $0.00,
- The Due amount will be recalculated,
and
- The Paid By and Paid To fields of
the transaction will be deleted.
- Click the No
button to save changes in QuickBooks but NOT sync changes to Needles.
- Click the Cancel
button to return to your changes.
Updating Names and Addresses
When the Link and Update option is selected for a Party or Provider
and the “Allow
address changes of Customers and Vendors” check box is selected, any
updates to the name and address will automatically be synced between the
two programs. If the check box is not selected, only updates to names
will be synced.