This section contains additional information that is important for you to know in order to make the most of your integration of Needles with Outlook.
Needles and Outlook do not need to be open in order to synchronize appointments. Single-staff appointments created in Needles or Outlook will sync between the programs if one is closed. However, if a multi-staff appointment is created in Needles, the appointment will be held until Outlook is reopened. Upon opening Outlook, the new multi-staff appointment that you created in Needles will display in an Outlook appointment window, where you may change details as necessary and send to add to staff calendars or delete the appointment. Any changes made to the appointment will be done silently.
This section includes helpful information on how the sync with Outlook handles specific data contained in an appointment item.
The Subject line of a Needles appointment is mapped to the Subject field in Outlook when using the Appointments sync.
When an appointment that is linked to a Needles case or provider is viewed in Outlook, the message section will display the text, “[Needles Info]” with information that pertains to the appointment, such as Party, Case #, Primary Staff and Status. If a change is made to the item, any text added above the “[Needles Info]” section will be saved and sent back to Needles. However, any text entered below the “[Needles Info]” section will be deleted if the item is ever changed in Needles.
When viewing an appointment in Needles that is linked to an Outlook appointment with multiple staff, the message section will display the text, “[Outlook Info]” with information that pertains to the appointment, such as Attendees, Required, Optional, and Resources.
Since Needles and Outlook use different methods for calculating and tracking recurring appointments, a recurring calendar item created in Needles will create individual items in Outlook for all occurrences. If you make a change in Outlook to one of those items, the change will only be made to that one occurrence. If you wish to change information that affects all occurrences, select “The entire series” option in Outlook. Changes made to the entire series in Outlook will be synced to the entire series in Needles.
Recurring appointments created in Outlook and synced to Needles may be changed in Needles and synced back to Outlook.
When the appointment synchronization is enabled, multi-staff appointments that are created in Outlook will be synced to the Needles calendar as multi-staff appointments. If the appointment is deleted in Outlook, it will also be deleted in Needles. When canceling an appointment from the detail view using the Cancel Meeting button, you have the option to send a cancellation update to all assigned staff using the Send Update button.
If the appointment is canceled from the right-click pop up menu, it will be removed from your Outlook calendar but will remain on the Outlook calendar of all assigned staff.
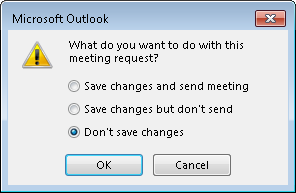
Multi-staff appointments created in Needles will sync to Outlook and display the appointment as a pop up window in Outlook. You must either send or delete the appointment request in order to navigate to other areas of Outlook. Any changes made to the appointment will sync back to Needles.
Select one of the options:
When changing appointments that occur in a series, you must choose to apply changes to a single appointment or the entire series.
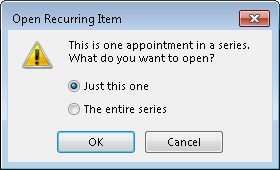
Multi-staff, recurring Needles appointments will be automatically updated when changes to non-time or non-recurrence fields have been made in Outlook. If you wish to make entire series changes to the time or recurrence pattern of a Needles multi-staff recurring appointment in Outlook, you must do so using the Recurrence button on the Meeting Series ribbon.
Meeting items created in Outlook will sync to Needles just like appointments. Once synced to Needles, modifications made in either program will sync back and forth.
When setting a reminder for a Needles appointment, click the Reminder dropdown to choose the time interval prior to the appointment. The interval can be set a maximum of two weeks prior to the appointment to match what is allowed in an Outlook appointment reminder. Reminders configured in Outlook or Needles will by synced in the same manner between programs.
If you are syncing your Outlook appointments to a mobile device and wish to create an appointment in your phone to sync back to Needles, you can assign a Category of “NeedlesSync” to the new appointment or, if there is no category field, place a # symbol as the first character in the Location field of the appointment. Once the appointment is in Outlook, the “NeedlesSync” category will be assigned and will sync the appointment to Needles.
The Appointment Outlook Mapping Table details the Needles fields used for appointments and the corresponding field used in Outlook for syncing.
| Needles Appointment Field Name | Outlook Appointment Field Name |
| (Calendar) Start Date + Start Time | Start |
| (Calendar) Stop Date + Stop Time | End |
| (Calendar) Subject | Subject |
| (Calendar) Location | Location
[NOTE: For those devices where you cannot assign a category, you will need to add the # symbol as the first character of the Location field of the calendar item created on the device in order for the sync to Needles to occur. If using an Android device, the # symbol should be the first character of the Where field.] |
| (Calendar) Must Remind | Reminder |
| (Calendar) Outlook Reminder | Remind Beforehand |
| (Calendar) Event | Message (before Needles Info section) |
| (Calendar) ID | NeedlesID |
| (Calendar) Case ID | CaseID |
| (Party) First Party Full Name | 1st Line of Needles Info in Message section |
| (Case) Case Number | 2nd Line of Needles Info in Message section |
| (Case) Alt Case Number | 3rd Line of Needles Info in Message section |
| (Case) Case Title | 4th Line of Needles Info in Message section |
| (Case) Primary Staff | 5th Line of Needles Info in Message section |
| (Case) Court | 6th Line of Needles Info in Message section |
| (Case) Judge | 7th Line of Needles Info in Message section |
| (Case) Docket | 8th Line of Needles Info in Message section |
| (Calendar) Status | 9th Line of Needles Info in Message section |
In order to disable the sync between Needles and Outlook for a particular staff, you must have proper permissions to the Staff Directory. To turn off the sync for Appointments:
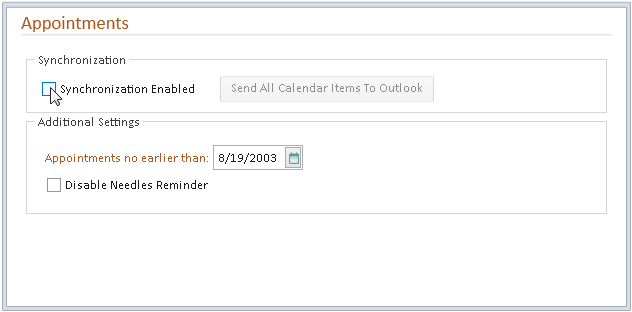
When synchronization is disabled, you’ll notice that the Send All Calendar Items To Outlook button is disabled. Appointments that have previously synced between Needles and Outlook will continue to sync when changes occur. You must turn the sync back on (select the Synchronization Enabled check box) in order to sync any new appointments that have not yet synced between Needles and Outlook.